
·Guide
Make.com PDF Generation: Complete Guide 2025
Learn how to automate PDF generation in Make.com with CustomJS. Step-by-step guide with templates for invoices, HTML to PDF, and page extraction. 600 free PDFs/month.
makepdfautomation
We provide a certified connector in the Microsoft Power Automate marketplace for professional HTML to PDF generation. No coding required—just add the connector to your flow and start generating PDFs with custom templates, QR codes, and advanced styling.
Generating professional PDFs in Power Automate is a common requirement—invoices, receipts, reports, contracts, and certificates. While Power Automate offers basic PDF conversion from Word templates, it falls short for dynamic HTML-to-PDF generation with custom styling, complex layouts, and professional formatting.
The challenge: Power Automate's native PDF actions are limited to Word document conversion and simple HTML. For production-grade PDFs with custom CSS, multi-page layouts, headers/footers, and precise formatting, you need a more powerful solution.
This comprehensive guide covers advanced PDF generation techniques in Power Automate using CustomJS. We'll explore real-world use cases, template design, performance optimization, and best practices for creating professional PDFs at scale.
Power Automate's built-in PDF actions have significant limitations:
CustomJS solves these problems with a professional HTML-to-PDF engine powered by Puppeteer (Chrome headless). You get pixel-perfect rendering, full CSS3 support, custom fonts, and a powerful templating engine—all without managing servers.
This example shows a complete workflow from trigger to PDF generation with a QR code:
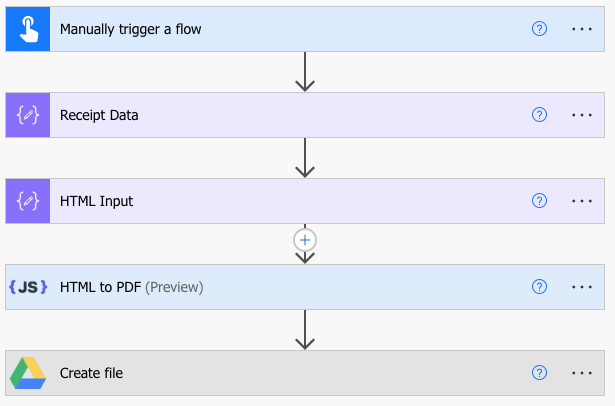
Complete Power Automate flow for PDF generation with QR code
Add a "Manually trigger a flow" trigger with these input fields:
Note: Power Automate will auto-generate internal names like text, text_1, number, number_1, etc. We'll map these to clean names in the next step.
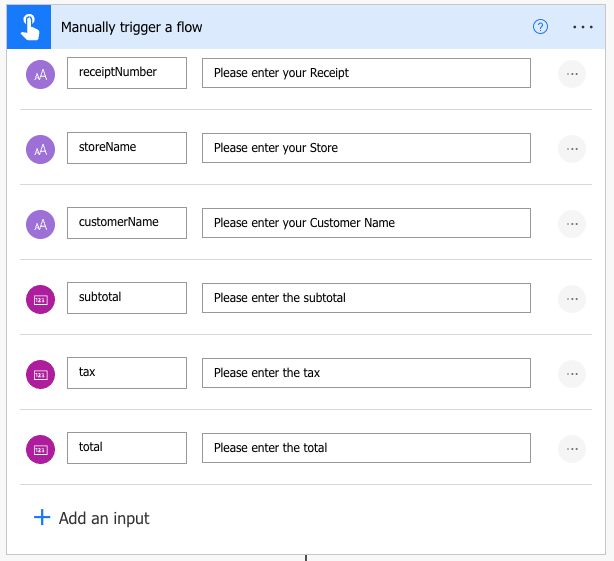
Manual trigger with input fields for receipt data
Add a "Compose" action named "Receipt Data" to map the auto-generated field names to readable names:
Inputs (JSON):
{
  "receiptNumber": "@{triggerBody()?['text']}",
  "storeName": "@{triggerBody()?['text_1']}",
  "customerName": "@{triggerBody()?['text_2']}",
  "subtotal": "@{triggerBody()?['number']}",
  "tax": "@{triggerBody()?['number_1']}",
  "total": "@{triggerBody()?['number_2']}"
}
Adjust the field names (text, text_1, number, etc.) to match what Power Automate generated for your trigger fields.
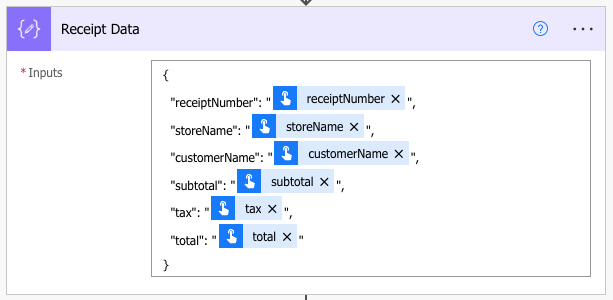
Compose action mapping trigger fields to clean JSON structure
Add a "Compose" action named "HTML Input" with this HTML template:
<!DOCTYPE html>
<html>
<head>
  <style>
    @page { margin: 15mm; }
    body {
      font-family: 'Courier New', monospace;
      max-width: 400px;
      margin: 0 auto;
      padding: 20px;
    }
    .receipt-header {
      text-align: center;
      border-bottom: 2px dashed #000;
      padding-bottom: 10px;
      margin-bottom: 20px;
    }
    .receipt-title {
      font-size: 24px;
      font-weight: bold;
      letter-spacing: 3px;
    }
    .info-section { margin: 20px 0; }
    .totals {
      margin-top: 20px;
      padding-top: 10px;
      border-top: 2px solid #000;
    }
    .total {
      font-size: 18px;
      font-weight: bold;
    }
    .qr-code {
      text-align: center;
      margin: 20px 0;
    }
  </style>
  <script type="module">
    import QRCode from 'https://cdn.jsdelivr.net/npm/[email protected]/+esm';

    window.__RENDER_DONE__ = false;

    async function generateQR() {
      try {
        const receiptUrl = 'https://yourstore.com/receipt/@{outputs('Receipt_Data')?['receiptNumber']}';
        const qrDataUrl = await QRCode.toDataURL(receiptUrl, {
          width: 150,
          margin: 1
        });
        document.getElementById('qr-img').src = qrDataUrl;
        window.__RENDER_DONE__ = true;
      } catch (err) {
        console.error('QR Code generation failed:', err);
        window.__RENDER_DONE__ = true;
      }
    }

    if (document.readyState === 'loading') {
      document.addEventListener('DOMContentLoaded', generateQR);
    } else {
      generateQR();
    }
  </script>
</head>
<body>
  <div class="receipt-header">
    <div class="receipt-title">RECEIPT</div>
    <p>#@{outputs('Receipt_Data')?['receiptNumber']}</p>
    <p>@{utcNow('yyyy-MM-dd HH:mm')}</p>
  </div>

  <div class="info-section">
    <strong>@{outputs('Receipt_Data')?['storeName']}</strong><br>
    123 Shop Street<br>
    +1 555-1234
  </div>

  <div class="info-section">
    <strong>Customer:</strong> @{outputs('Receipt_Data')?['customerName']}
  </div>

  <div class="totals">
    <div>Subtotal: $@{outputs('Receipt_Data')?['subtotal']}</div>
    <div>Tax: $@{outputs('Receipt_Data')?['tax']}</div>
    <div class="total">Total: $@{outputs('Receipt_Data')?['total']}</div>
  </div>

  <div class="qr-code">
    <img id="qr-img" style="max-width: 150px;">
    <p style="font-size: 10px;">Scan to verify receipt</p>
  </div>
</body>
</html>
Compose action with HTML template using clean field names
Add the CustomJS "HTML to PDF" action:
HTML Content field:
@{outputs('HTML_Input')}
Click "Add dynamic content" → Select "Outputs" from your "HTML Input" Compose action

CustomJS HTML to PDF action with HTML Input reference
You can add a "Google Drive - Create file" action to automatically save the PDF:
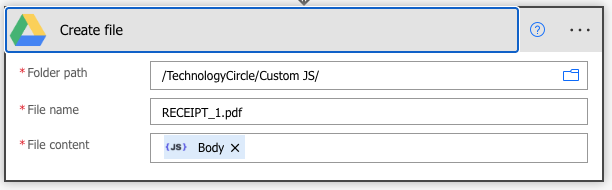
Upload generated PDF to Google Drive
✓ Result: The PDF will be returned as base64-encoded content. You can then email it, save to SharePoint, or download it. The QR code will be fully rendered in the PDF!
⚠️ Important: This example uses window.__RENDER_DONE__ = true because the QR code is generated asynchronously. The PDF generator waits for this flag before capturing the page.
Continue reading on similar topics
Learn how to automate PDF generation in Make.com with CustomJS. Step-by-step guide with templates for invoices, HTML to PDF, and page extraction. 600 free PDFs/month.

Learn how to automate PDF generation in n8n workflows. Complete guide covering HTML to PDF conversion, invoice generation, and workflow templates.

Create professional HTML receipt templates that convert perfectly to PDF. Use our free receipt PDF generator or choose from 5 customizable templates for e-commerce, SaaS, and service businesses.

Learn how to generate QR codes in PDF documents using JavaScript. Complete guide with examples for invoices, tickets, certificates, and business cards.

Execute JavaScript code directly in Power Automate. Integrate JavaScript with CustomJS in 5 minutes – no Azure Functions needed.

Cost-effective alternative to QuickBooks & FreshBooks. Automatic PDF invoice generation with n8n, Make.com, or API integration.
Solution:
window.__RENDER_DONE__ = true is setSolution:
page-break-inside: avoid on elements that should stay together@page margins to control page layoutSolution:
font-display: swap to font declarationsSolution:
data:image/png;base64,...Automatically generate and email PDF receipts when orders are placed:
Create monthly invoices for recurring subscriptions:
Issue course completion certificates or awards:
Create formatted reports from data:
CustomJS PDF generation uses a simple, predictable pricing model:
Example: Generating 1,000 invoices per month = 600 free + 400 paid = $4.00/month
Professional PDF generation in Power Automate doesn't have to be complicated. With CustomJS, you get enterprise-grade HTML-to-PDF conversion without managing servers, dealing with Word templates, or writing complex code.
Start with our ready-to-use templates, customize them for your needs, and scale to thousands of PDFs per month. The free tier (600 PDFs/month) is perfect for small businesses and testing, while the pay-as-you-go pricing scales with your needs.
Next steps:
About the Author: This guide is maintained by the CustomJS team. We build tools that make Power Automate more powerful. Questions? Contact us at [email protected]