How to Execute JavaScript in Microsoft Power Automate
Microsoft Power Automate is a powerful workflow automation tool, but it has one major limitation: there's no native way to execute JavaScript code directly. When you need complex data processing, API calls, or custom logic, you quickly hit a wall.
The good news: CustomJS makes it easy to integrate JavaScript into Microsoft Power Automate. Through a simple API connection, your flows can execute JavaScript code without relying on external services like Azure Functions. This saves time, reduces complexity, and makes your workflows more flexible.
This guide shows you how to use JavaScript in Microsoft Power Automate – from setting up your API key to practical applications in real workflows.
TL;DR
Microsoft Power Automate doesn't support native JavaScript – CustomJS fills this gap with a simple API integration.
With the CustomJS connector for Power Automate, you can execute JavaScript code directly in your flows.
Setup takes less than 5 minutes: get your API key, add the connector, execute code.
Common use cases: data processing, API calls, JSON manipulation, date calculations, and complex business logic.
CustomJS offers 600 free requests per month – perfect for small to medium workflows.
Why JavaScript in Microsoft Power Automate?
Microsoft Power Automate offers many pre-built actions, but sometimes they're not enough. When you need to perform complex calculations, call external APIs, or transform JSON data, you quickly reach the limits of native functions.
JavaScript is the ideal solution for these scenarios. It's flexible, widely used, and can handle virtually any task that comes up in a workflow. With CustomJS, you can execute JavaScript code directly in Microsoft Power Automate without setting up additional infrastructure like Azure Functions.
This not only saves time but also makes your workflows more maintainable and easier to understand.
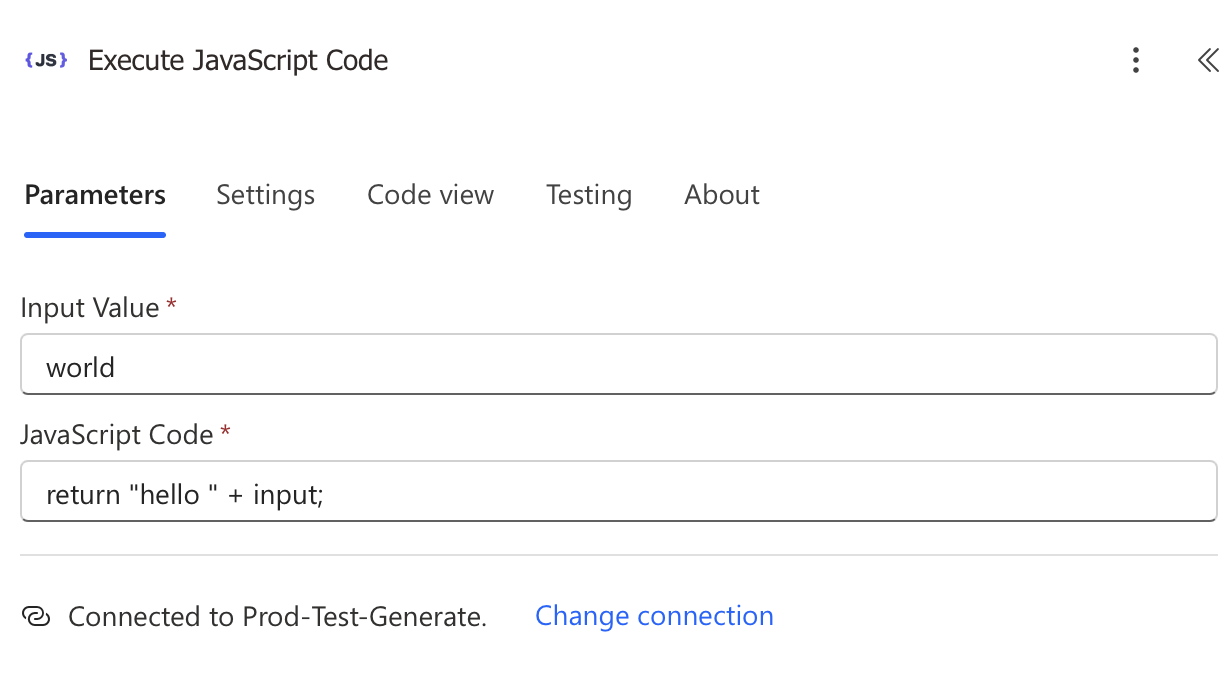
Step 1: Create Your CustomJS API Key
Before you can execute JavaScript in Microsoft Power Automate, you need an API key from CustomJS. Setup is straightforward:
To ensure your JavaScript integration in Microsoft Power Automate runs reliably, follow these best practices:
1. Always Include Error Handling
Use try-catch blocks to catch errors:
try {
  // Your code here
  const result = processData(input);
  return {
    success: true,
    data: result
  };
} catch (error) {
  return {
    success: false,
    error: error.message
  };
}
2. Validate Inputs
Always check that expected inputs are present:
if (!input || !input.value) {
  return {
    error: 'Missing required input: value'
  };
}

// Process here
const result = input.value * 2;
return result;
3. Await Async Results
When using asynchronous code (like fetch or API calls), always await the result before returning:
// ❌ Wrong: returns a Promise
return fetch(input.url).then(res => res.json());

// ✅ Correct: await and return the data
const response = await fetch(input.url);
const data = await response.json();

return {
  statusCode: response.status,
  data: data
};
4. Mind the Timeouts
CustomJS has a 30-second timeout per request. For longer operations, split your code or use asynchronous processing.
5. Remove Inline Comments
While inline comments usually work, they can sometimes cause issues. Consider removing them if you encounter problems:
// ⚠️ May cause issues
// return full name
return input.firstName + " " + input.lastName;

// ✅ Better
return input.firstName + " " + input.lastName;
CustomJS vs. Azure Functions
Many Microsoft Power Automate users turn to Azure Functions to execute JavaScript. However, CustomJS offers several advantages:
Criteria
CustomJS
Azure Functions
Setup Time
5 minutes
30-60 minutes
Infrastructure
None required
Azure account + deployment
Cost (small scale)
Free (600/month)
From ~$5/month
Maintenance
None
Updates, monitoring
Scaling
Automatic
Manual configuration
For most use cases, CustomJS is the faster and more cost-effective solution. Azure Functions only make sense at very high volumes or if you're already deeply invested in the Azure ecosystem.
Frequently Asked Questions
1. Can I use npm packages in CustomJS?
Yes, CustomJS supports many common npm packages. Most standard libraries like lodash, moment.js, or axios are available. For specific packages, contact support.
2. How secure is executing JavaScript through CustomJS?
CustomJS executes code in isolated environments. Your data is transmitted encrypted and not stored. The service is GDPR compliant.
3. Are there limits for code execution?
Yes, each request has a 30-second timeout and a maximum payload size of 10 MB. For most workflows, this is more than sufficient.
4. Can I use the code on other platforms too?
Yes, CustomJS works with any platform that supports HTTP requests. This includes Make.com, n8n, Zapier, and many others.
5. What happens if I exceed the free limit?
After 600 requests per month, additional requests are blocked until you upgrade to a paid plan. There are no hidden costs or automatic upgrades.
6. Can I test the code locally before using it in Power Automate?
Yes, CustomJS offers a web interface where you can test code before integrating it into your workflows. This saves time when debugging.
Conclusion
Using JavaScript in Microsoft Power Automate has never been easier. With CustomJS, you can integrate complex logic, API calls, and data processing into your workflows in just a few minutes – without additional infrastructure or complicated setups.
The combination of Microsoft Power Automate and CustomJS makes your automations more flexible, maintainable, and powerful. Whether you need to validate data, call external APIs, or perform complex calculations – JavaScript is the solution.
The free plan with 600 requests per month is sufficient for most projects. For larger workflows, flexible paid plans are available that grow with your requirements.
Start for free now and take your Microsoft Power Automate workflows to the next level.
Generate professional PDFs in Power Automate with CustomJS. Create invoices, receipts, reports, and certificates with custom HTML templates, QR codes, and advanced formatting. No Azure Functions required.
Convert Markdown to PDF with tables, code blocks, and custom styling. Complete guide with examples for API documentation, reports, and automated workflows. 600 free conversions/month.
If you want to improve your workflow in Make with JavaScript, there are some powerful tools available. Two of the best options are 0CodeKit and CustomJS.
Build automated KPI dashboards from Google Sheets using n8n and CustomJS. Generate interactive charts with Chart.js, host static HTML pages, and connect custom domains. Complete workflow template included.
Generate HTML forms with AI (no form builder) and send submissions to webhooks that trigger Make.com and n8n workflows. Includes copy-paste code and best practices.
A practical comparison of Puppeteer vs Playwright vs a managed Screenshot API. Feature matrix, code examples, scaling considerations, and how to choose in 2026.
Master async JavaScript execution in PDF generation. Learn the window.__RENDER_DONE__ pattern for reliable HTML to PDF conversion with QR codes, charts, and dynamic content.
Learn how to generate QR codes in PDF documents using JavaScript. Complete guide with examples for invoices, tickets, certificates, and business cards.
Learn how to automate PDF generation in Make.com with CustomJS. Step-by-step guide with templates for invoices, HTML to PDF, and page extraction. 600 free PDFs/month.