Advanced Human-in-the-Loop Workflows in n8n with Custom HTML Forms
n8n's native HITL tools handle simple yes/no decisions just fine. But the moment you need editable pre-populated forms, reviewer notes, or anything approaching a real content review — the cracks start to show. This article covers a 2-workflow architecture that actually holds up.
You've built an n8n workflow that generates AI blog posts, processes complex quotes, or prepares customer reports. At some point a human needs to look at the output before it goes anywhere. n8n has a Wait node and basic form triggers, and sure, they work — but anyone who's actually tried to build a real review workflow with them knows they start cracking pretty quickly.
The Wait node holds your workflow execution open for hours or even days. One server restart and the pending approval is just gone. Native n8n forms can't pre-populate fields with data from earlier nodes. And Slack buttons are fine for a quick approve/reject, but there's no way for someone to actually edit AI-generated text before sending it back.
This guide walks through a pattern that avoids all of that: n8n generates a custom HTML form, deploys it to customjs.space as a hosted page, sends the URL to whoever needs to review it, and then a completely separate webhook workflow catches the submission when they're done. No fragile long-running executions, no rigid form builders.
TL;DR
n8n's built-in HITL tools (Wait node, basic forms) break down for real approval workflows — no pre-filled fields, fragile to restarts.
Workflow 1 builds a dynamic HTML form, deploys it to customjs.space, notifies the reviewer with a link.
The reviewer gets a fully custom, pre-populated form — edit text, choose a decision, leave notes.
On submit, a fetch() call fires the payload into Workflow 2's webhook trigger.
Both workflows are short-lived. No hanging executions, no state stored in n8n memory.
n8n Community Template
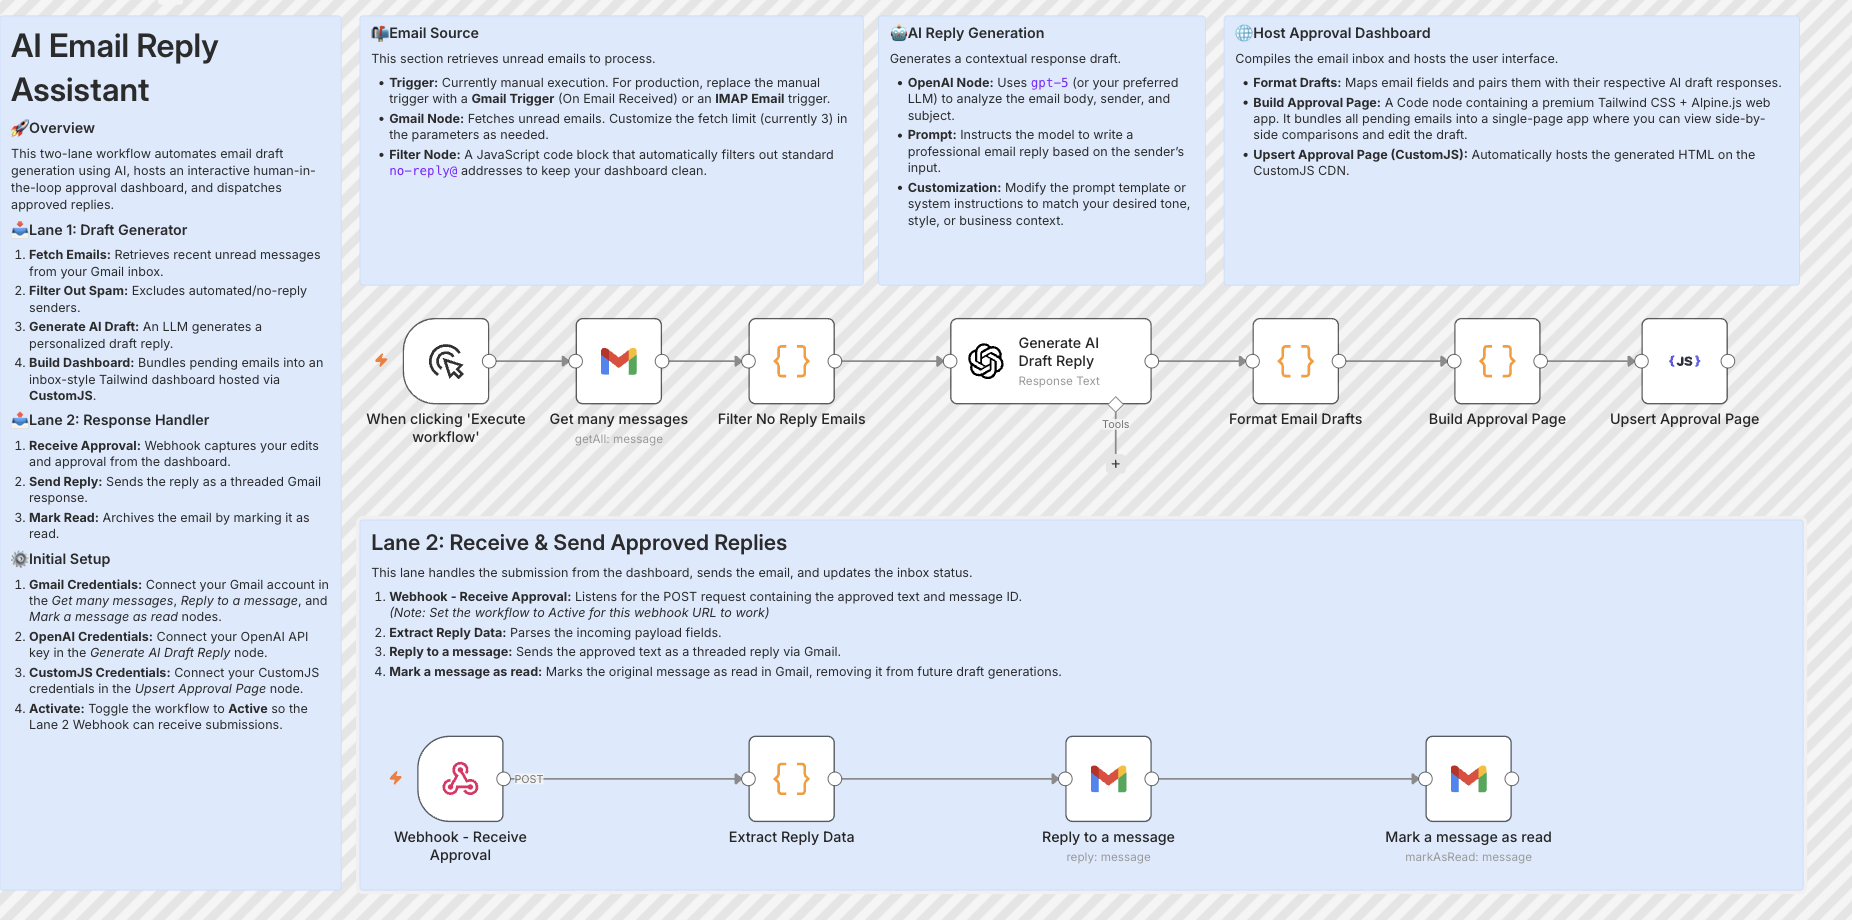
Host an AI Gmail reply approval inbox with OpenAI and CustomJS
Build super flexible and customizable Human-in-the-Loop (HITL) processes with n8n and CustomJS. Instead of letting AI reply autonomously, this workflow fetches data, drafts responses, and hosts interactive approval pages via CustomJS — ensuring full human quality control over your automations with optional custom domain hosting.
Lane 1 — Draft Generator
Fetches Gmail, filters no-reply addresses, generates an AI draft with OpenAI, builds a Tailwind approval dashboard and upserts it to CustomJS.
Lane 2 — Response Handler
Webhook catches the approved reply, sends it as a threaded Gmail response, and marks the original email as read.
The two-lane workflow: AI draft generation + CustomJS hosting on the left, webhook approval handler on the right
Where n8n's Built-in HITL Tools Fall Short
n8n does have human-in-the-loop support. The Wait node pauses execution until a webhook resumes it. The Form Trigger can collect user input. Slack and Teams nodes can push approval buttons. These are all legitimate tools and for certain use cases they work perfectly well.
But they weren't really built for the scenario where a human needs to read through AI-generated content, make edits, leave a note for the team, and only then send it onward. That's a different kind of interaction:
Tool
Good for
Breaks when
Wait Node
Short pauses, same-session approvals
Server restarts, multi-day review cycles
Form Trigger
Collecting fresh input
Can't pre-fill fields with existing data
Slack Buttons
Binary approve/reject
No room to edit content before deciding
Email + Link
Notifying reviewers
Still needs something at the other end to collect input
None of them were built for reviewing and editing AI output — which is increasingly the actual use case. That's the gap this pattern fills.
The 2-Workflow Setup
Instead of one long workflow that pauses halfway through waiting for a human, you split it in two. Workflow 1 does the generating and notifying. Workflow 2 handles whatever comes back from the reviewer. They never directly talk to each other — the only connection is the webhook URL baked into the form.
// WORKFLOW 1: The Generator
[Trigger] → AI generates output (blog post, quote, report)
↓
[HTML Node] → Inject data into HTML form template
↓
[Upsert HTML Page (CustomJS)] → host page → get unique URL
↓
[Notify] → Send URL via Slack / Email / Teams
↓
workflow ends — no waiting
// WORKFLOW 2: The Receiver (always listening)
[Webhook] → Fires when human submits the form
↓
[Switch] → Route by decision (approve / revise / reject)
↓
[Publish] → Write to CMS / CRM / database
↓
✓ Done
Workflow 1 finishes in a few seconds — no hanging execution, no open connection. Workflow 2 just sits there waiting for a webhook, which could fire 10 minutes later or three days later. Doesn't matter. The state isn't stored in n8n at all, it lives in the URL and the page hosted on customjs.space.
Why this survives server restarts
A Wait node stores its pending state in n8n's database. If n8n crashes or gets updated mid-review, long-pending executions tend to get lost or corrupted. Here, the pending state lives in the customjs-hosted URL — a static page that stays up regardless of what happens to n8n. When the reviewer finally submits, Workflow 2 simply starts fresh from the incoming webhook.
Phase A: Workflow 1 — Building the Review Interface
Workflow 1 has one job: take whatever data came out of your automation — an AI draft, a calculated quote, a processed document — and turn it into a hosted, interactive review page that a real human can open in a browser.
Step 1: Build the HTML form in the HTML Node
Use n8n's HTML node to construct the review form. You inject the dynamic data directly into the template using expression syntax — the AI draft goes straight into a textarea, the title into an input, and so on:
Step 2: Publish with the "Upsert HTML Page" CustomJS Node
After the HTML node, drop in the native Upsert HTML Page (CustomJS) node from the CustomJS n8n package. No HTTP requests to wire up manually — just connect your CustomJS credentials and fill in three fields:
// Upsert HTML Page (CustomJS) — node fields:

HTML Content:   {{ $json.html }}
Page Name:      review-{{ $json.jobId }}
TTL (seconds):  604800   ← link valid for 7 days

// The node returns:
{
  "url": "https://customjs.space/p/a8f2b...",
  "pageId": "review-abc123",
  "expiresAt": "2026-06-09T..."
}
The url in the output is what you send to your reviewer. Each execution with the same Page Name overwrites the previous version — useful if you want to update the draft before the reviewer opens it.
Step 3: Send the link
Last step in Workflow 1 is a notification via Slack, Email, or Teams. Include the URL and an expiry note, then the workflow is done. Whole thing runs in about 3–4 seconds:
// Slack node → Send a message
{
  "channel": "#content-review",
  "text": "📝 *AI Draft Ready for Review*\n\n*Title:* {{ $('AI Agent').first().json.title }}\n\nPlease review and approve here:\n{{ $json.url }}\n\n_Link valid for 7 days._"
}
And that's it for Workflow 1. No open execution sitting around waiting.
Phase B: What the Reviewer Actually Sees
The reviewer clicks the link from Slack and gets a clean, pre-filled form hosted on customjs.space. They can edit the text, pick a decision, leave notes. Below is a live simulation you can interact with:
🔒 customjs.space/p/ai-review-a8f2b
✏️
AI Draft — Needs Your Review
Live simulation — no real webhooks called
Phase C: Workflow 2 — Catching the Submission
Workflow 2 is pretty straightforward. A Webhook node sits dormant until a review form is submitted. One thing worth getting right here is the response mode:
Set responseMode to immediately. The HTML form's fetch() call is waiting for a response — if n8n takes 10 seconds processing downstream nodes before responding, the reviewer is staring at a loading spinner and wondering if something broke.
Routing by Decision
After the webhook, add a Switch node that routes based on the decision field:
If the reviewer requests changes, you can re-trigger the AI node with their notes and send a new review link. This turns the whole thing into a feedback loop between human judgment and AI output:
// "revise" branch — re-run AI with reviewer feedback
const revisionPrompt = `
  You previously wrote this article:
  ---
  Title: ${$json.title}

  ${$json.content}
  ---

  The reviewer asked for these changes:
  "${$json.notes}"

  Please revise accordingly. Keep the structure,
  just address the feedback.
`;

return {
  json: {
    prompt: revisionPrompt,
    originalTitle: $json.title,
    revisionRound: ($json.revisionRound || 0) + 1
  }
};
Putting it Together: AI Blog Post Pipeline
Here's a concrete production example — an automated Monday morning content pipeline that generates blog drafts and routes them through human review before publishing.
What this workflow does
Schedule trigger fires every Monday at 8am
AI node generates 3 blog drafts based on a Google Sheets content calendar
For each draft: builds the HTML review form, deploys to customjs.space
Posts to #content-team in Slack with three separate review links
Workflow 1 ends — about 15 seconds total
Reviewers open their links when they have time, edit as needed, click Submit
Workflow 2 publishes approved drafts to CMS, sends revisions back to the AI node
Need more than one person involved? Generate a separate form URL for each reviewer and track who approved what. The Split In Batches node handles the iteration:
// One URL per reviewer, reviewer email embedded in form
const reviewers = ['[email protected]', '[email protected]'];

const reviewItems = reviewers.map(email => {
  const formHtml = buildReviewForm({
    content: aiDraft,
    reviewerEmail: email,
    webhookUrl: `${baseWebhook}?reviewer=${encodeURIComponent(email)}`
  });

  return { json: { html: formHtml, reviewer: email } };
});

return reviewItems; // Split In Batches handles the rest
Expiring links
Pass a ttl value when deploying and the page disappears automatically after that many seconds. Useful for time-sensitive content or compliance reasons:
{
  "html": "...",
  "options": {
    "ttl": 259200,
    "title": "Review due by Friday"
  }
}
Richer review interfaces
Because you're writing plain HTML, there's no constraint on what the review form can do. Teams have used this pattern to build side-by-side diff views, inline paragraph-level comment tools, brand voice sliders, even mini preview panes that render the content as it would look on the actual website. Any JavaScript library that runs in a browser is fair game — Quill for rich text editing, Diff2Html for comparisons, Chart.js if you're reviewing data outputs.
It's a bit of extra effort compared to a basic form, but for teams doing serious AI-assisted content work the payoff is real. Reviewers who can see exactly how a piece will render before approving tend to catch more issues and submit cleaner payloads.
Why This Works Well in Practice
The main thing people notice when they switch to this pattern is that review cycles actually complete. With the Wait node approach, executions die silently on restarts and nobody realises a draft is stuck. Here, if n8n goes down for maintenance the review page is still up and the webhook will catch the submission whenever it arrives.
The second thing is design flexibility. Once you're writing plain HTML you can match your company's exact visual style, add custom validation logic, pre-fill as many fields as you want, and handle edge cases that no generic form builder would anticipate. There's no "contact support to unlock this field type."
And practically speaking — you're not spinning up a Next.js app just to host a 60-line review form. customjs.space takes a POST request and gives you back a URL in milliseconds. The infrastructure overhead is basically zero.
No hanging executions
Both workflows are short-lived. State lives in the URL, not in n8n memory.
Pre-populated editing
Reviewers tweak AI output rather than retyping it — saves a lot of time.
Full audit trail
Each webhook payload includes who submitted, when, what they changed and why.
Any notification channel
Slack, Teams, Email, WhatsApp — send the URL wherever the reviewer actually is.
Related CustomJS Capabilities
The HITL pattern is just one piece. A few things that often come up in the same workflows:
HTML to PDF node for n8n — once a draft is approved, generate a PDF version automatically for archiving or distribution.
PDF Generation with n8n — full guide covering invoice generation, reports, and document automation.
AI-Generated HTML Forms — the underlying pattern of building forms in code and connecting them to webhooks.
Can I still use the Wait node for quick approvals?
Yes, for approvals that happen within a few minutes — a manager sign-off on a small expense, say — the Wait node is perfectly fine. The 2-workflow setup pays off when reviews might take hours or days, or when you specifically need pre-filled editable forms.
How do I stop random people from submitting the form?
Easiest approach: embed a UUID token in the URL and store it as a hidden field. Anyone without the exact link can't do anything useful. For tighter security you can add a PIN shared via a separate Slack DM, or put HTTP Basic Auth on the receiving webhook.
What if the reviewer loses the link?
Store the page URL in Airtable, Notion or a Google Sheet as part of Workflow 1. If someone can't find their link they look it up in the sheet. You can also build a "resend" flow triggered by a Slack slash command — takes maybe 10 minutes to wire up.
Can this handle multi-stage review? Editor → manager → legal?
Yes. Each stage is its own Workflow 1 / Workflow 2 pair. When the editor approves, Workflow 2 generates a new form for the manager with all the edited content, and so on. You carry the full decision history in the webhook payload so each approver can see what changed before them.
How do I know which reviews are still pending?
Include a unique job ID in every form — generated in Workflow 1, embedded as a hidden field. When Workflow 2 fires, update a record in your database with status: 'reviewed'. A daily scheduled workflow can then flag anything pending for more than 48 hours and nudge the reviewer.
Does this work with self-hosted n8n?
Completely. The customjs.space API is a standard REST endpoint — it doesn't care whether n8n is on n8n.cloud or a VPS somewhere. You just need outbound internet access to api.customjs.space and a publicly reachable webhook URL for the form to POST to.
Final Thoughts
This pattern isn't magic, it's just a sensible separation of concerns. Workflow 1 generates and notifies, Workflow 2 handles the response. n8n builds the form, customjs.space hosts it, a second webhook catches the submission. The human gets a clean branded interface with everything pre-filled. The workflow gets structured input back.
If you want to skip the setup from scratch, the n8n community template shown above covers the core architecture and is a solid starting point. Pair it with a free customjs.space account — 600 page deployments per month, no credit card needed — and you can have something running the same afternoon.
Compare the best form builders for automation in 2026. CustomJS vs. Typeform vs. Jotform vs. Tally vs. Fillout. Features, pricing, and real-world use cases. Save $420-1,056/year on automation costs.
Automate lead generation and user onboarding with form webhooks. Connect forms to Make.com, n8n, and Zapier for instant CRM updates, email sequences, and team notifications. 600 free submissions/month.
Convert emails to webhooks for Make.com, n8n, and Zapier automation. Process invoices, support tickets, orders, and alerts automatically. Native n8n module included. 600 free emails/month.