Blog

Deploy HTML Landing Pages in Seconds: The Simple Alternative to Vercel & Netlify

Vercel and Netlify are powerful platforms for deploying modern web applications. But when you just need to deploy a simple HTML landing page—whether it's AI-generated, a marketing campaign, or a quick prototype—these platforms can feel like overkill. Git repositories, build configurations, CLI tools, deployment pipelines... it's a lot of setup for what should be a simple task.

According to BuiltWith's 2024 hosting trends, while Vercel and Netlify dominate the JAMstack space, over 60% of simple landing pages still use traditional hosting because developers find modern platforms too complex for basic HTML deployment.

This guide shows you a simpler approach: deploy HTML pages via API or a simple UI in seconds. No Git, no build steps, no configuration files. Just upload your HTML and get an instant URL. You can even link your custom domain with a simple CNAME record. Perfect for AI-generated landing pages, quick campaigns, A/B testing, and rapid prototyping.

TL;DR

  • Deploy HTML pages via API or UI—no Git, no build configs, no CLI tools required.
  • UI option: Paste HTML, click deploy, done. Easy custom domain setup via CNAME.
  • API option: Perfect for automation with n8n, Make.com, and AI-generated pages.
  • Instant deployment with upsert logic: create new or update existing pages by name.
  • Free tier includes 600 API calls per month, making it cost-effective for most projects.

The Problem with Vercel & Netlify for Simple HTML

Don't get me wrong—Vercel and Netlify are excellent platforms. They're perfect for complex applications with frameworks like Next.js, React, or Vue. But for a simple HTML landing page, they introduce unnecessary complexity:

  • Git repository required: You need to create a repo, commit files, and push changes just to update a single HTML file.
  • Build configuration: Even for static HTML, you often need configuration files (netlify.toml, vercel.json).
  • CLI tools: Learning and installing platform-specific command-line tools adds friction.
  • Deployment pipelines: CI/CD is great for apps, but overkill for a landing page that changes once a month.
  • Learning curve: Understanding deployment settings, environment variables, and build commands takes time.

For a developer who just wants to deploy HTML generated by ChatGPT or create a quick campaign page, this feels like using a sledgehammer to crack a nut.

The Simple Solution: Deploy HTML via API or UI

CustomJS offers two ways to deploy HTML pages—both incredibly simple. Choose the method that fits your workflow:

Option 1: Deploy via API (For Automation)

Perfect for developers and automation workflows. Here's the entire deployment process:

  1. Make a single API call with your HTML content
  2. Get back an instant URL where your page is live
  3. That's it. No Git, no builds, no configuration.

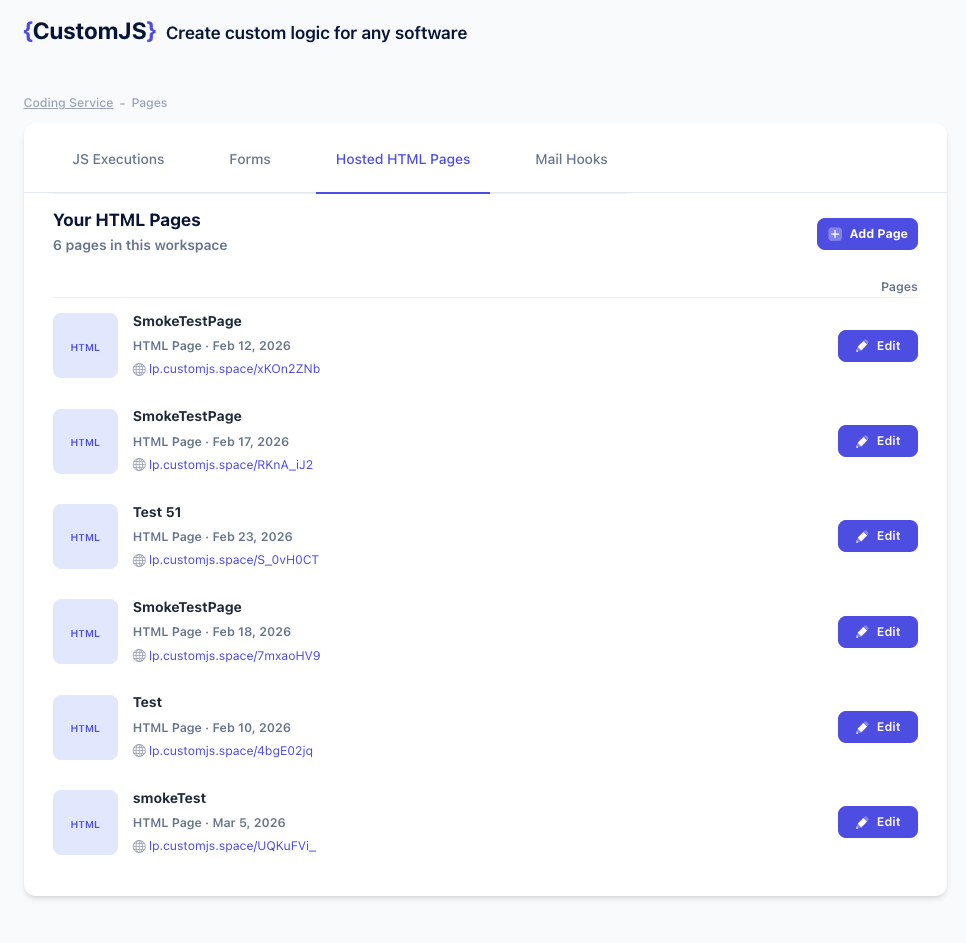
Option 2: Deploy via UI (No Code Required)

Prefer a visual interface? Use the CustomJS dashboard to deploy pages with just a few clicks:

  1. Paste your HTML into the editor
  2. Click "Deploy"
  3. Your page is live instantly
CustomJS HTML Hosting UI - HTML Editor and Preview

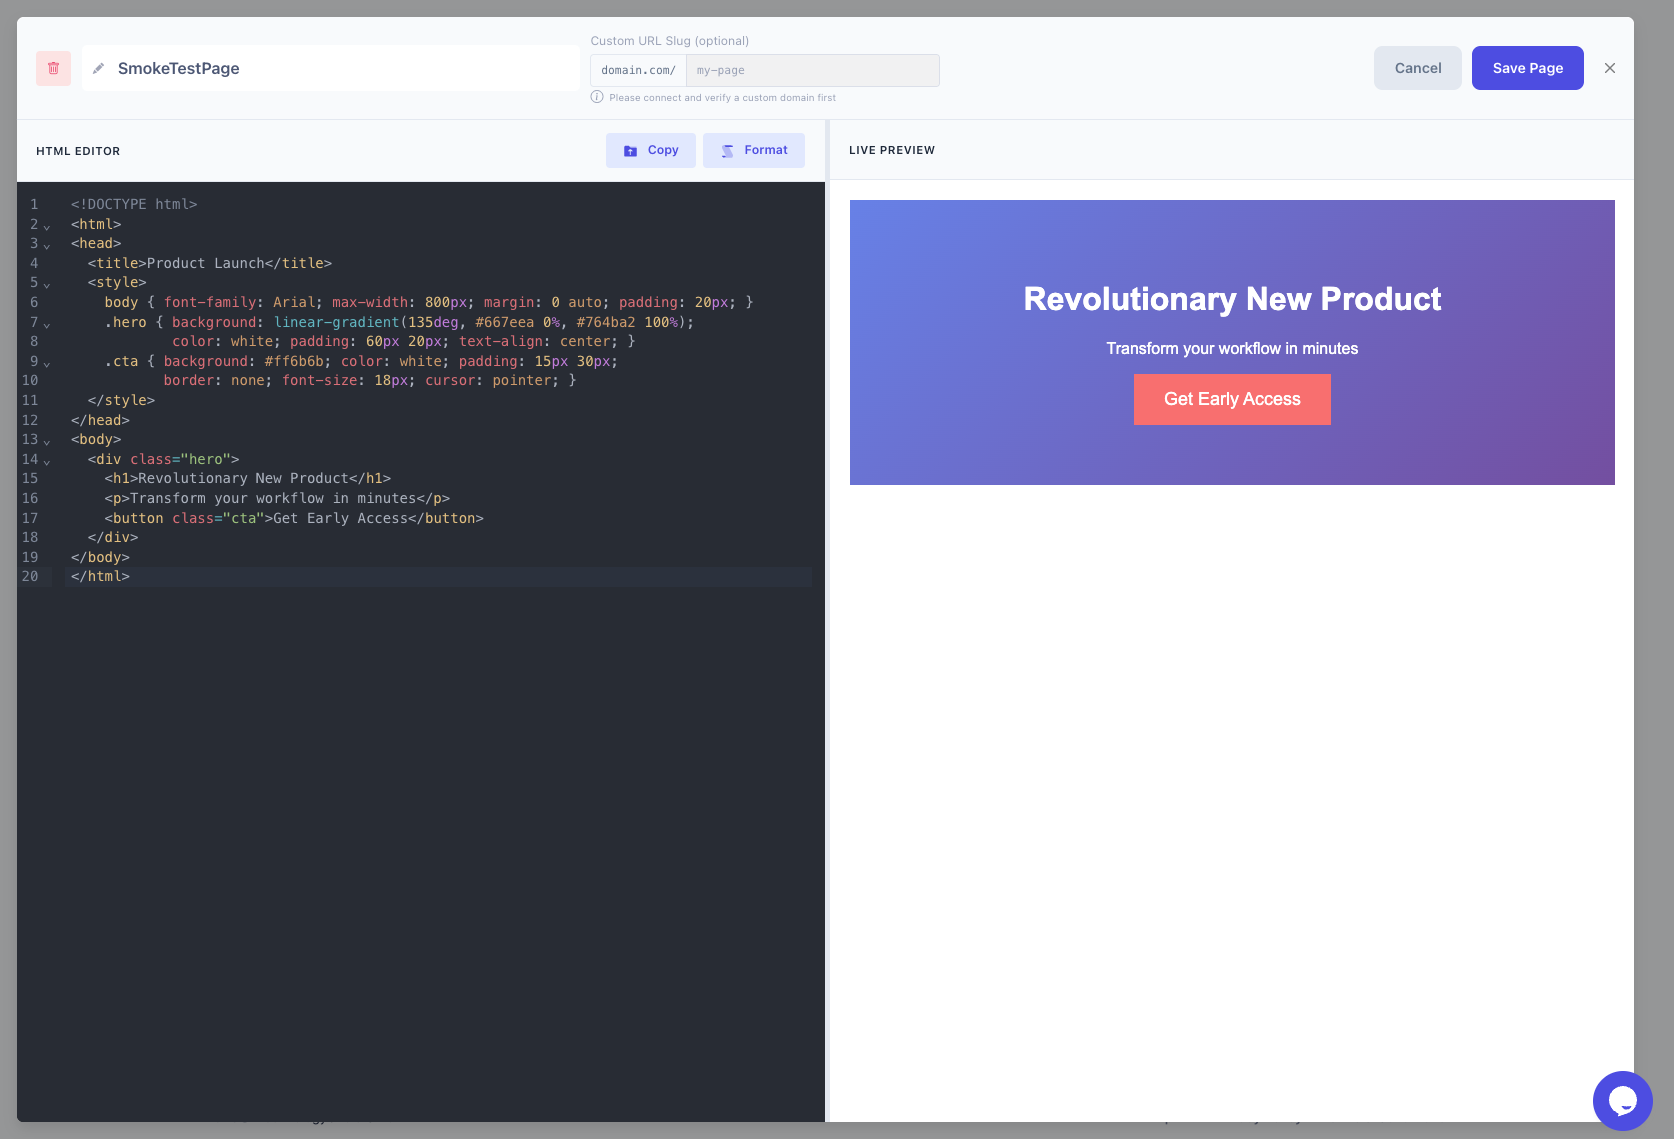
Paste your HTML code and preview it before deployment

CustomJS HTML Hosting UI - Deploy Page

Deploy your HTML page with one click

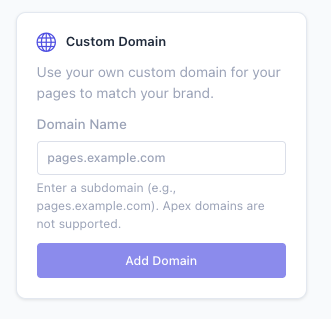
Bonus: Custom Domain Setup
In the UI, you can easily link your own domain via CNAME. Just add a CNAME record pointing to CustomJS, and your pages will be served from your branded domain (e.g., pages.yourdomain.com). No complex DNS configuration or SSL certificate management—it's all handled automatically.

CustomJS Custom Domain Setup via CNAME

Link your custom domain with a simple CNAME record

API Example: Deploy Your First Page

curl -X POST 'https://api.app.customjs.io/pages/page/upsert-html' \
  -H 'x-api-key: YOUR_API_KEY' \
  -H 'Content-Type: application/json' \
  -d '{
    "name": "my-landing-page",
    "htmlContent": "<!DOCTYPE html><html><head><title>My Page</title></head><body><h1>Hello World</h1></body></html>",
    "slug": "my-custom-page"
  }'

Response:

{
  "pageId": "abc123",
  "htmlFileUrl": "https://pages.customjs.io/my-custom-page",
  "name": "my-landing-page",
  "message": "Page created successfully",
  "created": true
}

Your page is now live at the returned URL. Want to update it? Just make the same API call with the same name—the API automatically updates the existing page (upsert logic).

Perfect Use Cases

1. AI-Generated Landing Pages

ChatGPT, Claude, and Gemini can generate complete HTML landing pages. With the CustomJS API, you can deploy them instantly:

// ChatGPT generates HTML, you deploy it
const aiGeneratedHTML = \`
<!DOCTYPE html>
<html>
<head>
  <title>Product Launch</title>
  <style>
    body { font-family: Arial; max-width: 800px; margin: 0 auto; padding: 20px; }
    .hero { background: linear-gradient(135deg, #667eea 0%, #764ba2 100%); 
            color: white; padding: 60px 20px; text-align: center; }
    .cta { background: #ff6b6b; color: white; padding: 15px 30px; 
           border: none; font-size: 18px; cursor: pointer; }
  </style>
</head>
<body>
  <div class="hero">
    <h1>Revolutionary New Product</h1>
    <p>Transform your workflow in minutes</p>
    <button class="cta">Get Early Access</button>
  </div>
</body>
</html>
\`;

const response = await fetch('https://api.app.customjs.io/pages/page/upsert-html', {
  method: 'POST',
  headers: {
    'x-api-key': 'YOUR_API_KEY',
    'Content-Type': 'application/json'
  },
  body: JSON.stringify({
    name: 'product-launch-2025',
    htmlContent: aiGeneratedHTML,
    slug: 'product-launch'
  })
});

const result = await response.json();
console.log('Live at:', result.htmlFileUrl);

2. Quick Marketing Campaigns

Launch campaign pages in minutes without waiting for developers or deployment pipelines:

  • Create landing page in Figma or design tool
  • Export to HTML or use a template
  • Deploy via API call
  • Share link in marketing materials immediately
  • Update content anytime with another API call

3. A/B Testing Pages

Deploy multiple page variants instantly for testing:

import requests

variants = {
    'variant-a': '<html><body><h1>Buy Now - 50% Off!</h1></body></html>',
    'variant-b': '<html><body><h1>Limited Time: Half Price!</h1></body></html>',
    'variant-c': '<html><body><h1>Save Big Today!</h1></body></html>'
}

for slug, html in variants.items():
    response = requests.post(
        'https://api.app.customjs.io/pages/page/upsert-html',
        headers={'x-api-key': 'YOUR_API_KEY'},
        json={
            'name': f'ab-test-{slug}',
            'htmlContent': html,
            'slug': slug
        }
    )
    print(f'{slug}: {response.json()["htmlFileUrl"]}')

4. Event Landing Pages

Perfect for conferences, webinars, product launches, and time-sensitive events:

  • Deploy event page weeks in advance
  • Update details (speakers, schedule, venue) instantly via API
  • No need to redeploy entire site or wait for build pipelines
  • Delete page after event ends with a simple DELETE request

5. Client Demos and Prototypes

Show concepts to clients without complex setup:

  • Create mockup in HTML/CSS
  • Deploy in seconds
  • Share URL with client
  • Iterate based on feedback with instant updates
  • No need for hosting accounts or server access

6. Form Landing Pages

Combine with CustomJS Form Builder for complete lead capture solutions:

<!DOCTYPE html>
<html>
<head>
  <title>Contact Us</title>
  <style>
    body { font-family: Arial; max-width: 600px; margin: 50px auto; }
    input, textarea { width: 100%; padding: 10px; margin: 10px 0; }
    button { background: #4f46e5; color: white; padding: 12px 24px; border: none; }
  </style>
</head>
<body>
  <h1>Get in Touch</h1>
  <form action="https://forms.customjs.io/YOUR_FORM_ID" method="POST">
    <input type="text" name="name" placeholder="Your Name" required>
    <input type="email" name="email" placeholder="Your Email" required>
    <textarea name="message" placeholder="Your Message" rows="5"></textarea>
    <button type="submit">Send Message</button>
  </form>
</body>
</html>

How It Works: The API

Upsert Logic: Create or Update

The API uses intelligent upsert logic based on the name parameter:

  • First call with a name: Creates a new page
  • Subsequent calls with same name: Updates the existing page
  • Different name: Creates a new, separate page

This means you can update your landing pages without worrying about creating duplicates or managing page IDs.

Custom Slugs for Branded URLs

The optional slug parameter lets you create memorable URLs:

{
  "name": "summer-sale-2025",
  "slug": "summer-sale",
  "htmlContent": "..."
}

// Results in: https://pages.customjs.io/summer-sale

Slugs must be lowercase letters, numbers, and hyphens only (3-100 characters). If omitted, a unique slug is auto-generated.

Instant Deployment

Unlike traditional platforms with build steps:

  • No build queue or waiting time
  • No compilation or optimization steps
  • HTML is served exactly as provided
  • Changes are live immediately (typically <1 second)

Integration Examples

n8n Workflow: Generate HTML → Deploy → Notify

Create an automated workflow that generates and deploys landing pages:

  1. Trigger: Webhook or schedule
  2. HTTP Request: Fetch data from your CRM/database
  3. Code Node: Generate HTML from template + data
  4. CustomJS Node: Deploy HTML page via API
  5. Slack/Email: Send notification with live URL

Learn more in our n8n integration guide.

Make.com Scenario: Airtable → HTML → Deploy

Build landing pages from Airtable data automatically:

  1. Airtable Trigger: New record or updated record
  2. Text Aggregator: Build HTML from Airtable fields
  3. HTTP Module: Call CustomJS Pages API
  4. Google Drive: Log deployed URLs to spreadsheet

Check out our Make.com integration documentation.

ChatGPT + API: Deploy Directly from AI

Use ChatGPT's function calling to deploy pages:

// Define function for ChatGPT
const functions = [{
  name: "deploy_landing_page",
  description: "Deploy an HTML landing page",
  parameters: {
    type: "object",
    properties: {
      html: { type: "string", description: "Complete HTML content" },
      slug: { type: "string", description: "URL slug for the page" }
    }
  }
}];

// ChatGPT generates HTML and calls this function
async function deploy_landing_page(html, slug) {
  const response = await fetch('https://api.app.customjs.io/pages/page/upsert-html', {
    method: 'POST',
    headers: {
      'x-api-key': process.env.CUSTOMJS_API_KEY,
      'Content-Type': 'application/json'
    },
    body: JSON.stringify({
      name: `ai-generated-${Date.now()}`,
      htmlContent: html,
      slug: slug
    })
  });
  
  return await response.json();
}

Advanced Use Cases

Automated Campaign Pages from Google Sheets

import requests
import gspread
from oauth2client.service_account import ServiceAccountCredentials

# Connect to Google Sheets
scope = ['https://spreadsheets.google.com/feeds']
creds = ServiceAccountCredentials.from_json_keyfile_name('credentials.json', scope)
client = gspread.authorize(creds)
sheet = client.open('Campaign Pages').sheet1

# Get campaign data
campaigns = sheet.get_all_records()

for campaign in campaigns:
    html = f'''
    <!DOCTYPE html>
    <html>
    <head>
      <title>{campaign['title']}</title>
      <style>
        body {{ font-family: Arial; text-align: center; padding: 50px; }}
        h1 {{ color: {campaign['color']}; }}
      </style>
    </head>
    <body>
      <h1>{campaign['headline']}</h1>
      <p>{campaign['description']}</p>
      <a href="{campaign['cta_link']}">{campaign['cta_text']}</a>
    </body>
    </html>
    '''
    
    response = requests.post(
        'https://api.app.customjs.io/pages/page/upsert-html',
        headers={'x-api-key': 'YOUR_API_KEY'},
        json={
            'name': campaign['slug'],
            'htmlContent': html,
            'slug': campaign['slug']
        }
    )
    
    print(f"Deployed: {response.json()['htmlFileUrl']}")

Dynamic Event Pages from CRM Data

// Fetch upcoming events from CRM
const events = await fetchEventsFromCRM();

for (const event of events) {
  const html = `
    <!DOCTYPE html>
    <html>
    <head>
      <title>${event.name} - Register Now</title>
      <meta name="description" content="${event.description}">
      <style>
        body { font-family: 'Helvetica Neue', Arial; max-width: 800px; margin: 0 auto; }
        .hero { background: linear-gradient(135deg, #667eea 0%, #764ba2 100%); 
                color: white; padding: 80px 20px; text-align: center; }
        .details { padding: 40px 20px; }
        .register-btn { background: #ff6b6b; color: white; padding: 15px 40px; 
                        text-decoration: none; display: inline-block; }
      </style>
    </head>
    <body>
      <div class="hero">
        <h1>${event.name}</h1>
        <p>${event.date} | ${event.location}</p>
      </div>
      <div class="details">
        <h2>About This Event</h2>
        <p>${event.description}</p>
        <h3>Speakers</h3>
        <ul>${event.speakers.map(s => `<li>${s.name} - ${s.title}</li>`).join('')}</ul>
        <a href="${event.registrationUrl}" class="register-btn">Register Now</a>
      </div>
    </body>
    </html>
  `;
  
  await deployPage({
    name: `event-${event.id}`,
    htmlContent: html,
    slug: event.slug
  });
}

Multi-Language Landing Pages

const translations = {
  en: { title: 'Welcome', cta: 'Get Started' },
  de: { title: 'Willkommen', cta: 'Jetzt Starten' },
  es: { title: 'Bienvenido', cta: 'Empezar' },
  fr: { title: 'Bienvenue', cta: 'Commencer' }
};

for (const [lang, text] of Object.entries(translations)) {
  const html = `
    <!DOCTYPE html>
    <html lang="${lang}">
    <head><title>${text.title}</title></head>
    <body>
      <h1>${text.title}</h1>
      <button>${text.cta}</button>
    </body>
    </html>
  `;
  
  await fetch('https://api.app.customjs.io/pages/page/upsert-html', {
    method: 'POST',
    headers: {
      'x-api-key': 'YOUR_API_KEY',
      'Content-Type': 'application/json'
    },
    body: JSON.stringify({
      name: `landing-${lang}`,
      htmlContent: html,
      slug: `welcome-${lang}`
    })
  });
}

Managing Your Pages

List All Pages

curl -X GET 'https://api.app.customjs.io/pages/api/page' \
  -H 'x-api-key: YOUR_API_KEY'

Get Specific Page

curl -X GET 'https://api.app.customjs.io/pages/api/page/id/PAGE_ID' \
  -H 'x-api-key: YOUR_API_KEY'

Update Existing Page

Simply use the same name in your upsert call:

curl -X POST 'https://api.app.customjs.io/pages/page/upsert-html' \
  -H 'x-api-key: YOUR_API_KEY' \
  -H 'Content-Type: application/json' \
  -d '{
    "name": "my-landing-page",
    "htmlContent": "<html><body><h1>Updated Content</h1></body></html>"
  }'

Delete Page

curl -X DELETE 'https://api.app.customjs.io/pages/api/page/id/PAGE_ID' \
  -H 'x-api-key: YOUR_API_KEY'

Comparison: CustomJS vs Vercel vs Netlify

FeatureCustomJS Pages APIVercelNetlify
Setup ComplexityAPI call or UI pasteGit repo + config filesGit repo + config files
Deployment SpeedInstant (<1s)Build time (10s-5min)Build time (10s-5min)
Best ForSimple HTML pages, campaigns, prototypesFull applications, Next.js, ReactJAMstack sites, static generators
Git RequiredNoYesYes
CLI ToolsOptionalRequired for best experienceRequired for best experience
API-FirstYes - designed for automationLimited API supportLimited API support
Free Tier600 API calls/month100GB bandwidth100GB bandwidth
Pricing ModelPay per API call$20/month for Pro features$19/month for Pro features

Bottom line: If you're building a complex application with a framework, use Vercel or Netlify. If you just need to deploy simple HTML pages quickly, CustomJS is the simpler, faster choice.

Step-by-Step Tutorial: Deploy Your First Page in 2 Minutes

Step 1: Get Your API Key

Sign up at app.customjs.io and copy your API key from the dashboard. The free tier includes 600 API calls per month.

Step 2: Create Your HTML

Create a simple HTML file or use AI to generate one:

<!DOCTYPE html>
<html lang="en">
<head>
  <meta charset="UTF-8">
  <meta name="viewport" content="width=device-width, initial-scale=1.0">
  <title>My First Landing Page</title>
  <style>
    body {
      font-family: 'Segoe UI', Tahoma, Geneva, Verdana, sans-serif;
      margin: 0;
      padding: 0;
      background: linear-gradient(135deg, #667eea 0%, #764ba2 100%);
      min-height: 100vh;
      display: flex;
      align-items: center;
      justify-content: center;
    }
    .container {
      background: white;
      padding: 60px 40px;
      border-radius: 20px;
      box-shadow: 0 20px 60px rgba(0,0,0,0.3);
      max-width: 600px;
      text-align: center;
    }
    h1 {
      color: #333;
      margin-bottom: 20px;
      font-size: 2.5em;
    }
    p {
      color: #666;
      font-size: 1.2em;
      line-height: 1.6;
      margin-bottom: 30px;
    }
    .cta-button {
      background: #ff6b6b;
      color: white;
      padding: 15px 40px;
      border: none;
      border-radius: 50px;
      font-size: 1.1em;
      cursor: pointer;
      transition: transform 0.2s;
    }
    .cta-button:hover {
      transform: scale(1.05);
    }
  </style>
</head>
<body>
  <div class="container">
    <h1>Welcome to My Landing Page</h1>
    <p>This page was deployed in seconds using the CustomJS Pages API. No Git, no build steps, no complexity.</p>
    <button class="cta-button">Get Started</button>
  </div>
</body>
</html>

Step 3: Deploy via API

Save your HTML to a file and deploy it:

# Read HTML from file and deploy
HTML_CONTENT=$(cat landing-page.html)

curl -X POST 'https://api.app.customjs.io/pages/page/upsert-html' \
  -H 'x-api-key: YOUR_API_KEY' \
  -H 'Content-Type: application/json' \
  -d "{
    \"name\": \"my-first-page\",
    \"htmlContent\": $(echo "$HTML_CONTENT" | jq -Rs .),
    \"slug\": \"my-first-page\"
  }"

Step 4: Visit Your Live Page

The API returns your page URL. Open it in a browser—your page is live!

{
  "pageId": "abc123xyz",
  "htmlFileUrl": "https://pages.customjs.io/my-first-page",
  "name": "my-first-page",
  "message": "Page created successfully",
  "created": true
}

That's it! Your landing page is now live and accessible worldwide. Total time: under 2 minutes.

Combining with Other CustomJS Features

Landing Page + Form Builder

Create complete lead capture solutions by combining HTML Pages with the Form Builder:

  1. Create a form using the Form Builder
  2. Get the form embed code or webhook URL
  3. Build landing page HTML with the form
  4. Deploy via Pages API
  5. Submissions automatically trigger webhooks to your CRM

Landing Page + PDF Generation

Generate downloadable resources on your landing pages:

  1. Deploy landing page with download button
  2. Button triggers API call to HTML to PDF API
  3. User receives instant PDF download
  4. Perfect for lead magnets, reports, certificates

Landing Page + Screenshots

Automatically generate social media preview images:

  1. Deploy landing page via Pages API
  2. Use Screenshot API to capture preview
  3. Use screenshot as og:image for social sharing
  4. Automate with n8n or Make.com

Best Practices

1. Use Descriptive Names

Choose clear, descriptive names for easy management:

// Good
name: "summer-sale-2025"
name: "webinar-landing-march"
name: "product-launch-beta"

// Avoid
name: "page1"
name: "test"
name: "landing"

2. Inline Critical CSS

For best performance, inline your CSS in the <head>:

  • Faster initial render (no external CSS requests)
  • No CORS or loading issues
  • Better for simple landing pages

3. Optimize Images

Use optimized images for faster loading:

  • Compress images before embedding
  • Use modern formats (WebP) with fallbacks
  • Consider data URIs for small images (<10KB)
  • Use CDN URLs for larger images

4. Add Meta Tags

Include proper meta tags for SEO and social sharing:

<head>
  <meta charset="UTF-8">
  <meta name="viewport" content="width=device-width, initial-scale=1.0">
  <title>Your Page Title</title>
  <meta name="description" content="Compelling description for search engines">
  
  <!-- Open Graph for social sharing -->
  <meta property="og:title" content="Your Page Title">
  <meta property="og:description" content="Description for social media">
  <meta property="og:image" content="https://yourcdn.com/preview.jpg">
  
  <!-- Twitter Card -->
  <meta name="twitter:card" content="summary_large_image">
</head>

5. Test Responsiveness

Ensure your pages work on all devices:

  • Use responsive CSS (flexbox, grid, media queries)
  • Test on mobile, tablet, and desktop
  • Include viewport meta tag
  • Use relative units (%, em, rem) instead of fixed pixels

6. Version Your Pages

For important campaigns, consider versioning:

// Keep versions for rollback
name: "campaign-v1"
name: "campaign-v2"
name: "campaign-v3"

// Or use dates
name: "campaign-2025-03-15"

Pricing and Limits

CustomJS Pages API uses transparent, developer-friendly pricing:

  • Free Tier: 600 API calls per month (create, update, list, delete operations)
  • Page Size Limit: 10MB per HTML file
  • No Storage Fees: Hosted pages don't count against storage limits
  • Bandwidth: Included in API pricing, no separate charges
  • Custom Domains: Easy CNAME setup in the UI, automatic SSL certificates

Example usage: Deploying 50 campaign pages and updating them 5 times each = 300 API calls = Free

Compare this to Vercel ($20/month for Pro) or Netlify ($19/month for Pro) when you only need simple HTML hosting.

Start free with 600 API calls per month

Frequently Asked Questions

1. Can I use custom domains?

Yes! You can easily link your custom domain via CNAME in the CustomJS UI. Just add a CNAME record pointing to CustomJS, and your pages will be served from your branded domain (e.g., pages.yourdomain.com). SSL certificates are automatically provisioned and managed for you.

2. Is JavaScript supported in deployed pages?

Yes! You can include JavaScript in your HTML. The pages are served as-is, so any client-side JavaScript will work normally.

3. How do I update an existing page?

Simply make another API call with the same name parameter. The API automatically updates the existing page instead of creating a duplicate.

4. Can I deploy entire websites or just single pages?

The API is designed for single HTML pages. For multi-page sites with routing, consider using Vercel or Netlify. However, you can deploy multiple separate pages and link between them.

5. What happens if I exceed the free tier?

After 600 API calls per month, additional calls are billed at standard rates. You'll receive notifications before hitting limits, and can upgrade your plan anytime.

6. Are the pages SEO-friendly?

Yes! Pages are served as standard HTML with proper headers. Search engines can crawl and index them normally. Make sure to include proper meta tags for best SEO results.

7. Can I embed forms, videos, or third-party widgets?

Absolutely! You can embed any HTML, including forms, YouTube videos, Google Maps, chat widgets, analytics scripts, etc. The HTML is served exactly as you provide it.

8. How long do deployed pages stay live?

Pages remain live indefinitely as long as your account is active. There's no automatic expiration. You can delete pages anytime via the API.

Conclusion

Deploying HTML landing pages doesn't have to involve Git repositories, build pipelines, or complex configuration. With CustomJS Pages API, you get instant deployment with a single API call—perfect for AI-generated pages, marketing campaigns, rapid prototyping, and automation workflows.

While Vercel and Netlify excel at deploying complex applications, CustomJS offers a simpler, faster alternative for basic HTML pages. No learning curve, no infrastructure, no overhead—just upload your HTML and get a live URL in seconds.

Whether you're deploying AI-generated landing pages from ChatGPT, automating campaign pages from spreadsheets, or building rapid prototypes for clients, the Pages API provides the simplicity and speed you need.

Get started free with 600 API calls per month

Related Articles

Continue reading on similar topics